Consistent roll maintenance is a necessary aspect of maximizing cast film and extrusion coating...
Essential Feedscrew and Barrel Maintenance Part II
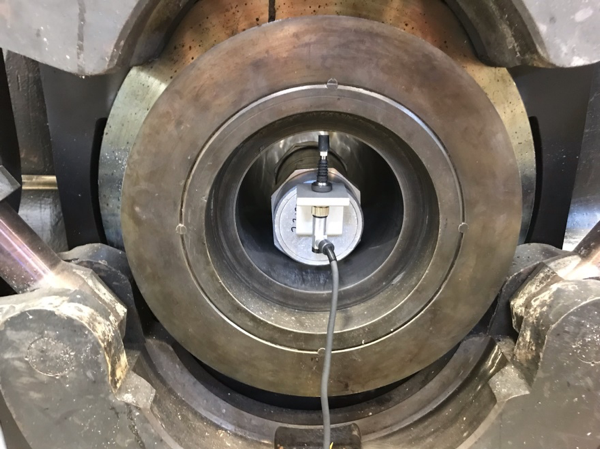
Figure 1. Measurement device placed in extruder barrel
In the blog post, Essential Feedscrew and Barrel Maintenance Part I, we discussed the importance of maintaining the clearance between the screw and barrel on your extruder to ensure that your equipment is operating at maximum efficiency.
The clearance between the screw and barrel will increase due to wear over time under normal operating conditions. This wear has two components, one decreasing the outer diameter of the extruder feedscrew and the other increasing the inner diameter of the extruder barrel cylinder. The rate of wear on the screw is designed to occur at a faster rate than the wear on the extruder barrel. This is done for a practical reason since it is easier to replace the extruder screw versus the extruder barrel. This blog will examine how to accurately measure the inner diameter of the extruder barrel.
The ID measurement is made using a custom electronic micrometer mounted on a movable sled, shown in Figure 1 and 2. The barrel must be very clean and at room temperature. The device is calibrated to the original barrel diameter and positioned in the extruder barrel.
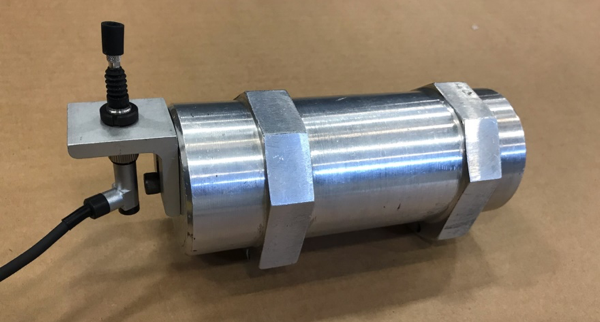
Figure 2. Close up of measurement device mounting sled
The sled is moved, typically in one L/D (Length/Extruder barrel diameter) axial increments along the length of the barrel and readings are taken and recorded. These readings are then compared to the original dimensions showed in Table 1.
Figure 3 below shows the results on a worn barrel that needs to be replaced.
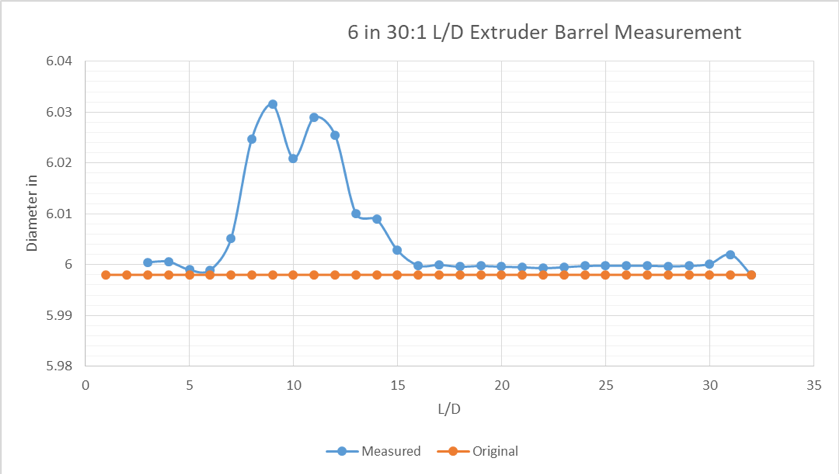
Figure 3. Barrel inner diameter measurement vs. original dimension
Required cleaning tools: wire brush that fits snuggly in the barrel and copper gauze.
Required measuring tools: electronic micrometer
Process: The following steps will ensure accurate measurement and documentation.
- Remove screw from extruder
- Clean barrel at operating temperature – chimney brush mounted on an extension rod
- Allow machine to cool to room temperature
- Using the electronic micrometer, take readings of the diameter along the barrel
- Compare the measurements to the original dimensions by plotting the diameter vs L/D
- If the inner diameter of the barrel is worn to a value that is two times the original radial clearance between the screw and barrel, the barrel should be replaced. See Table 1

Table 1. Extruder barrel inner diameter dimensions
Have questions or a comment about this blog? Please comment below or email marketing: marketing@davis-standard.com
In the next blog post of this series, we will discuss purging methodologies of your feedscrew and barrel. Stay tuned!
